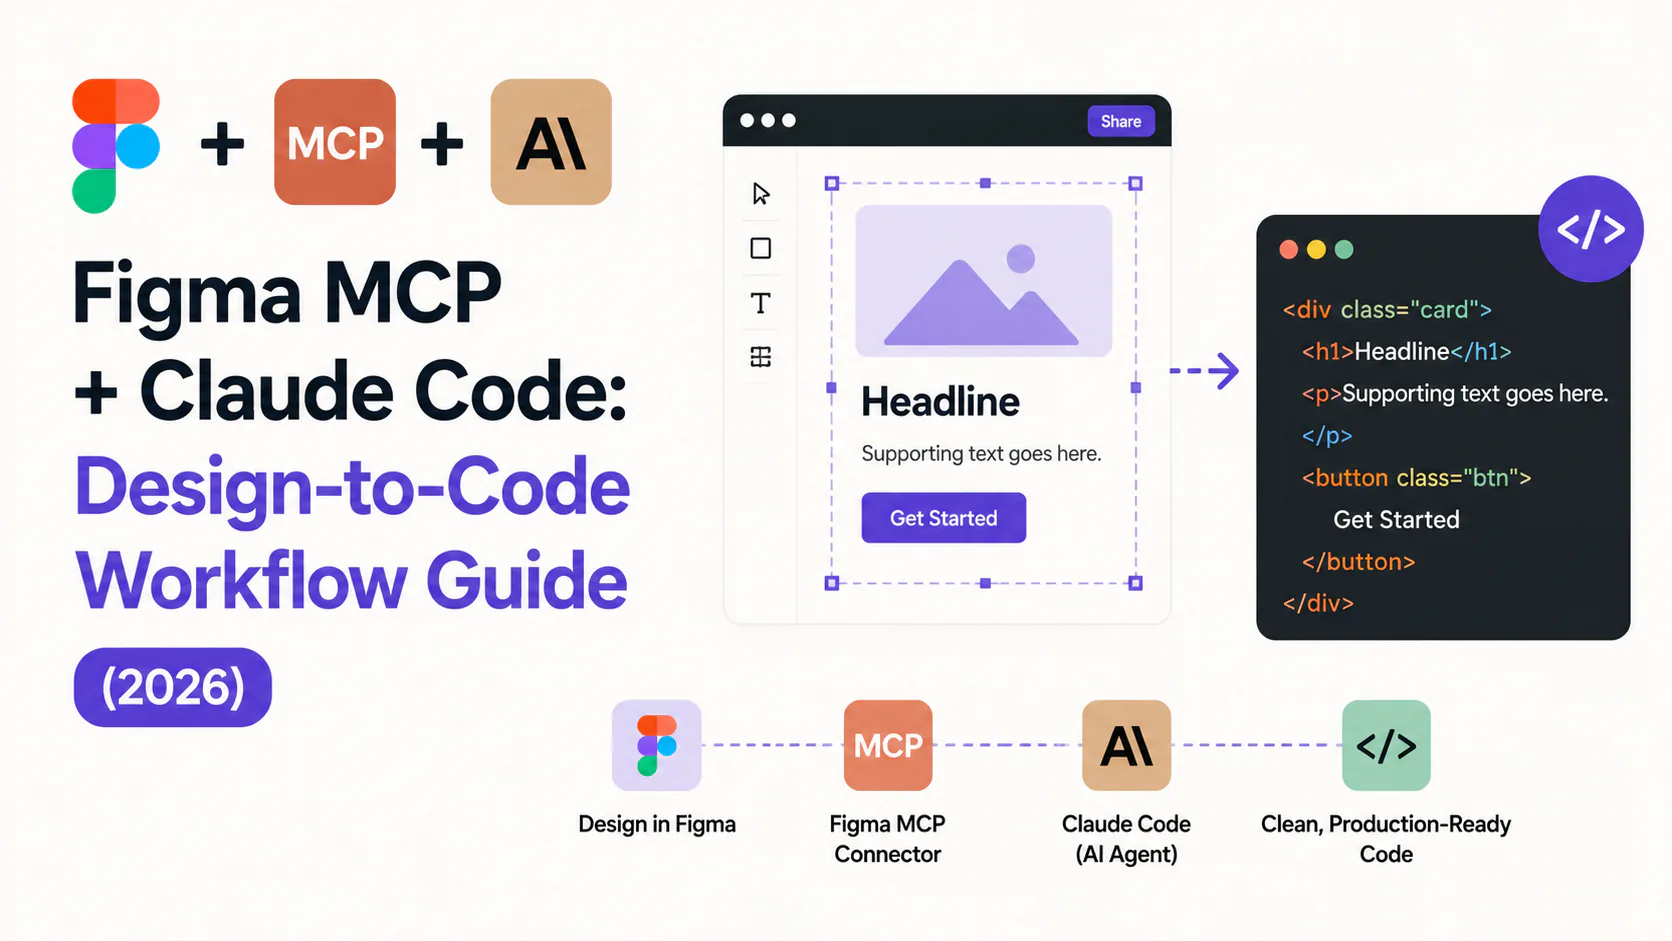
Figma MCP + Claude Code: Design-to-Code Workflow Guide (2026)
Set up Figma MCP with Claude Code for design-to-code workflows in 2026. Plugin install, Code Connect, rate limits, and tips for production-quality output.
The design handoff has always been a translation problem. Designers work in Figma frames and auto-layout constraints. Developers work in component props and CSS tokens. The gap between them cost every team hours per sprint in manual interpretation, annotation, and drift.
The Figma MCP server changes the architecture of that handoff. Instead of exporting specs or screenshots, you give Claude Code direct read access to your Figma file. The agent reads your component hierarchy, resolves your design tokens, and produces code that references your actual components rather than reconstructing them from scratch.
This guide covers how to set up the Figma MCP server with Claude Code, how the underlying system works, and what you need in place for it to deliver production-quality output.
TL;DR: The Figma MCP server gives Claude Code structured access to your design file instead of a screenshot. Setup takes about 10 minutes. The output quality scales directly with how mature your Code Connect mappings and design tokens are. If those are not in place, read the Code Connect section before running your first prompt.
What the Figma MCP Server Actually Does
Most AI coding tools that accept a Figma design are working from a screenshot. The agent sees the visual end state but not the decisions behind it: which component was used, which token maps to that blue, how the auto-layout relationships are structured.
The Figma MCP server is the third option. It sits between Figma's REST API and your AI agent, filtering raw design data into a structured, token-efficient representation that an LLM can act on directly. Pixel positions become layout relationships. Raw hex values become design token references. Deeply nested layer groups get flattened to match the DOM structure a developer would build.
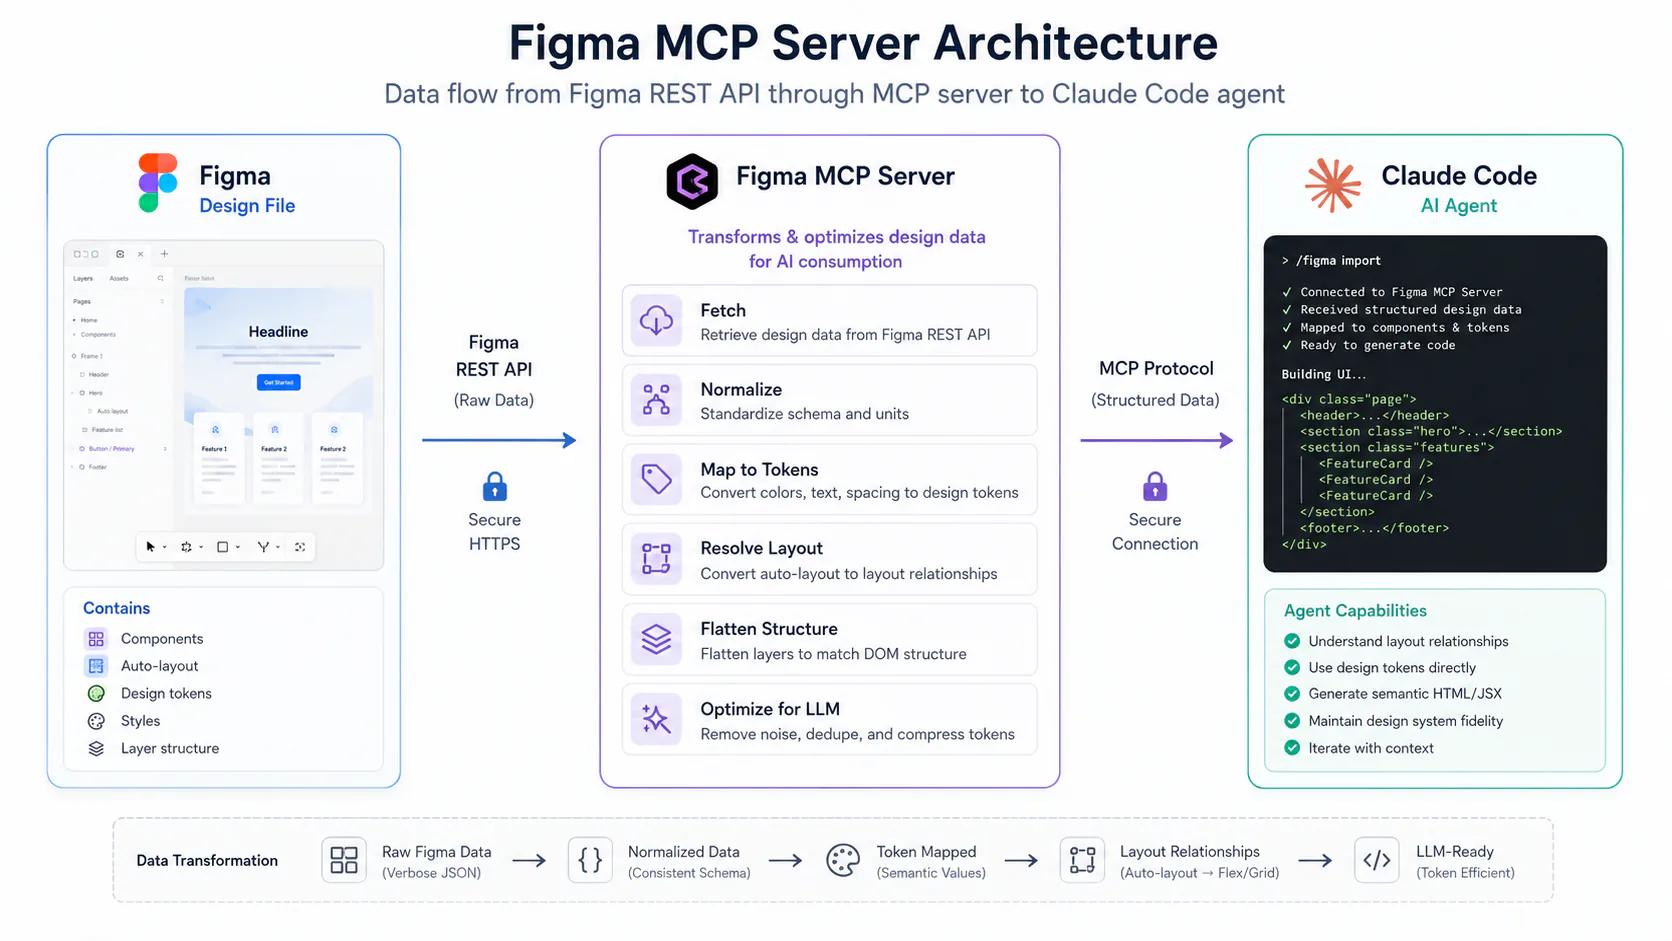
The practical result: when Claude Code receives a Figma frame URL through the MCP server, it calls get_code_connect_map to resolve which codebase components match which Figma components, then get_variable_defs to get your token values, then get_design_context for the layout and hierarchy. It writes <Button variant="primary" /> using your actual import path rather than rebuilding a <button> with inline styles.
That distinction matters most when you have a design system. Without MCP context, AI-generated code looks correct in a screenshot but fails a design system audit on the first PR review.
MCP as the integration standard
MCP (Model Context Protocol) is now the standard protocol for connecting AI agents to external tools. Anthropic created it, but Claude Code, Cursor, GitHub Copilot in VS Code, and OpenAI Codex all support it. The Figma MCP server publishes over this standard protocol, meaning the same Figma connection works across all of those clients.
MCP's adoption has been fast. Monthly SDK downloads reached 97 million by March 2026, up from 100,000 at launch. The Figma MCP server hit 2,400 monthly searches in February 2026 from a standing start three months earlier. These are signals that the workflow is moving from early-adopter territory into mainstream adoption.
Remote vs. desktop server
Figma provides two MCP server versions. The remote server is what most teams should use: it requires no Figma desktop app, works from cloud-based IDEs and CI pipelines, and has the full feature set including write-to-canvas. The desktop server is for specific enterprise configurations where network restrictions or data residency requirements prevent remote server use.
Prerequisites
Before you set up the Figma MCP connection, confirm the following:
Figma plan and seat type. Rate limits vary significantly by plan. Starter plan users get 6 tool calls per month, which runs out in a single complex component session. For a functional agentic workflow, you need at minimum a Dev or Full seat on a Professional, Organization, or Enterprise plan (200-600 calls/day depending on tier). Check your current seat type in Figma account settings.
Claude Code installed. The Figma plugin installs directly into Claude Code via the plugin marketplace. If you have not set up MCP yet, start with our MCP server setup guide before continuing.
Code Connect configured (strongly recommended). Code Connect is the mapping layer that tells the MCP server which Figma component corresponds to which codebase import path. Without it, the agent can see your design structure but cannot reference your existing components. The monday.com engineering team documented exactly what happens when this is missing: the output used hardcoded colors, overrode typography system defaults, and wrote CSS manually where component props should have been used. The design looked correct from a distance but failed a system audit.
If your Code Connect mappings are not yet in place, complete that setup first. Figma's Code Connect UI in Dev Mode (September 2025 update) connects to GitHub with a single click and makes the mapping process significantly faster than manual configuration.
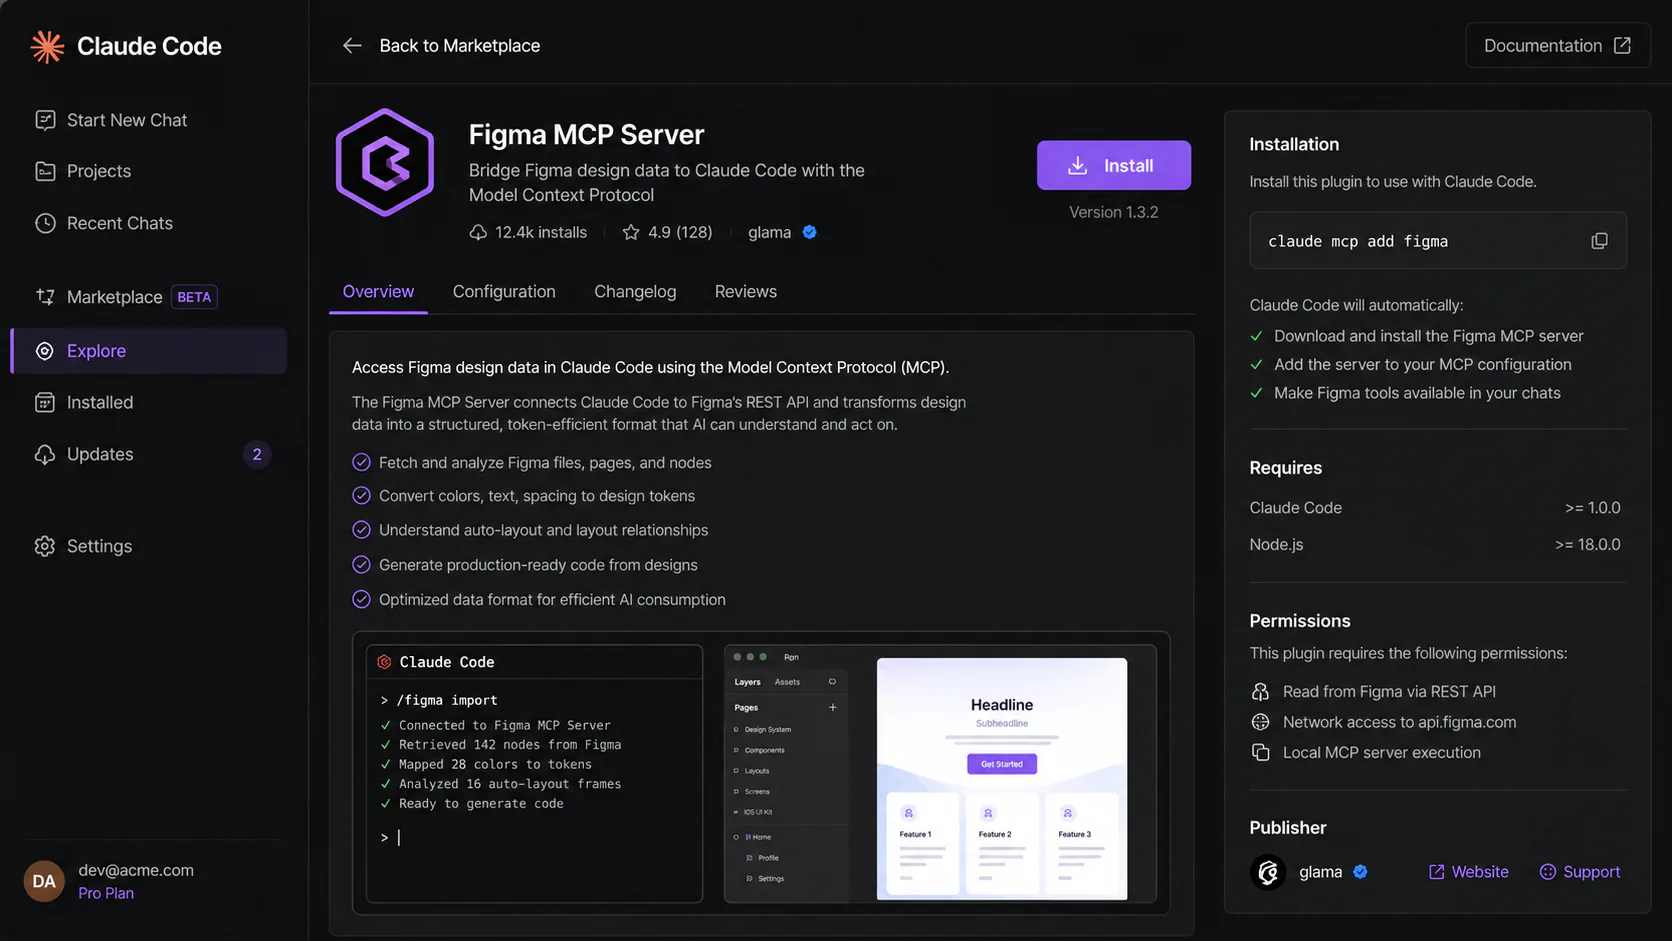
Step 1: Install the Figma Plugin in Claude Code
Open Claude Code. Type /plugin and press Enter to open the Plugin marketplace. Search for "Figma" and select the Figma server. Press Enter to start the authorization page.
The plugin installation includes the MCP server settings and a set of Agent Skills: pre-packaged workflow instructions for common tasks like component generation, design token export, and code-to-canvas sync. Skills do not add new MCP capabilities; they reduce setup guesswork by bundling recommended tool call sequences into reusable prompts.
After authorization completes, restart Claude Code. The Figma MCP server will appear in your active connections list.
One conflict to watch for: if you have both a "Figma Desktop" connector and a "Figma (remote)" connector installed, they can conflict and break both. Remove the desktop connector unless your organization specifically requires it. There is also a known protocol version mismatch after the April 2026 Claude Desktop update (Claude bumped its MCP protocol version to 2025-11-25; the Figma extension was still on 2025-06-18). If the Figma connection fails after a Claude update, check the Figma MCP known issues page for current compatibility status.
Step 2: Set Up a Figma API Token
The Figma MCP server authenticates with a personal access token scoped to your Figma workspace. Generate one in Figma under Account Settings > Personal Access Tokens.
Store the token as an environment variable. Do not paste it into shell history or commit it to a config file in your repository.
export FIGMA_ACCESS_TOKEN="your_token_here"
# Add to .zshrc or .bashrc to persist across sessions
The access token grants read access to every Figma file in your workspace. For teams working with sensitive designs (unreleased product work, NDA client files), document where the token is stored and who has access to it. In a 2026 audit of 68 MCP packages, 118 security findings were identified across the ecosystem, including dependency chain risks in several packages. The Figma MCP server itself is official, but treat the token with the same care as any credential with broad workspace access.
Step 3: Understand the Tool Call Sequence
Before running your first prompt, understand what the agent is doing under the hood. Claude Code sequences these read tools in a typical component implementation:
Claude Code receives Figma URL + prompt
        │
get_metadata
(confirm node exists, get file structure)
        │
get_code_connect_map
(resolve Figma components to codebase imports)
        │
get_variable_defs
(extract token values: colors, spacing, typography)
        │
get_design_context
(layout, hierarchy, component props for target frame)
        │
[optional] get_screenshot
(visual verification for image-heavy or interactive components)
        │
Generate production code
(uses resolved imports, token references, prop names)
The most common failure mode is calling get_design_context on an entire Figma page rather than a specific node. The Claude Code default context limit for MCP tool responses is 25,000 tokens. A complex Figma page can easily return 350,000 tokens and get truncated, producing incomplete or incorrect output. Always target a specific frame node, not the full page.
Add an AGENTS.md file at your repository root with instructions to call get_metadata first. This pre-resolves the node ID and prevents the agent from attempting a full-page context fetch.
# Figma MCP Usage
When implementing a Figma design:
1. Always call get_metadata first to confirm the node ID.
2. Call get_code_connect_map before generating any component.
3. Use get_variable_defs to resolve token names before hardcoding values.
4. Target specific frames with get_design_context, never full pages.
5. Use component imports from get_code_connect_map output. Do not rebuild components from scratch.
Step 4: Run Your First Design-to-Code Prompt
With the plugin installed and a Figma frame URL ready, open a Claude Code session and paste the frame URL alongside your implementation prompt.
Implement the dashboard card component from this Figma frame: [PASTE_FIGMA_URL]

Use the existing components from our codebase. Apply design tokens, not hardcoded values.
Target output: TypeScript React component with Tailwind classes.
Claude Code will call the MCP tool sequence described above and return a component that references your actual codebase imports and token names.
For a design token generation workflow, the prompt looks like this:
Create a design language system for our app. Primary brand color is #2563EB.
Secondary is #1E293B. Base spacing unit is 4px scaling to 32px.
Typography: Inter. Write all tokens into the open Figma file using the variables panel.
Claude Code with write-to-canvas access will generate color scales, semantic state tokens, spacing tokens, and typography tokens and write them directly to your Figma variables panel. A full token set that would take several hours manually runs in minutes.
Step 5: Use the Code-to-Figma Direction
The bidirectional workflow is the more significant architectural shift in the March 2026 update. Before it, the flow was one direction: design file to code. Now agents can also read a running UI and write it back to Figma as editable design layers.
From a Claude Code session with write-to-canvas access:
Send this to Figma.
URL: http://localhost:3000/components/checkout-form
Create editable Figma layers from the rendered state.
Apply design system tokens where values match existing variables.
The generate_figma_design tool reads your running UI at the specified URL and converts it into Figma-native primitives: frames, components, auto-layout, variables. The designer receives editable layers that are already structurally connected to the design system. They refine, push the updated design back to the agent with get_design_context, and the developer implements changes with full token context intact.
One permission note: write-to-canvas requires a Full seat. Dev seats can only write to personal drafts, not shared production Figma files. Teams where developers hold Dev seats and designers hold Full seats will hit this restriction when trying to close the bidirectional loop.
When to Use Figma MCP vs. the Alternatives
The Figma MCP workflow is not the right tool for every scenario. Here is a clear decision framework:
| Scenario | Best approach |
|---|---|
| Design-system-compliant React code from existing Figma components | Figma MCP + Claude Code or Cursor |
| Fast full-stack prototype from scratch, no existing design system | Lovable or Bolt |
| React component library with Tailwind and shadcn/ui | v0 (Vercel) |
| Non-technical designer validating interactions | Figma Make |
| Design system token sync and documentation | Supernova |
| Traditional annotated spec for manual developer implementation | Figma Dev Mode or Zeplin |
The core tradeoff between Figma MCP and Figma Make comes down to whether the output is a prototype or production code. Figma Make uses a screenshot of your design to reconstruct it with AI, which works well for interactive prototypes where a non-technical user needs the output quickly. Figma MCP gives the agent access to the actual design file structure, which produces code that passes a design system audit.
For teams with mature Code Connect mappings, the difference in output quality is significant: MCP-based output uses text-primary-600 where screenshot-based output hardcodes #1E40AF. One integrates with your system; the other requires refactoring on every PR.
Limitations to Know Before You Commit
Rate limits will hit you sooner than expected
The Professional plan's 200 calls/day limit sounds generous until you run a real agentic workflow. A single complex component implementation sequences 5-7 MCP tool calls. At that rate, 200 daily calls gives you roughly 30-40 component implementations per day across your entire team. Community forums document multiple teams hitting limits within a week of upgrading seats, with rate limit propagation delays causing intermittent failures that are hard to debug.
Starter plan users (6 calls/month) will exhaust their quota in one session. This is not a viable plan for anything beyond a one-off experiment.
Rate limits apply to read tools. The write-to-canvas tools (use_figma, generate_figma_design) are in beta and currently free, but the announced transition to usage-based pricing will introduce a cost variable that cannot yet be forecasted.
Design system quality is the ceiling, not MCP
The monday.com engineering team ran the documented version of the failure most teams will hit if they arrive at MCP with an underdeveloped design system. Their first attempt generated output that used hardcoded colors, overrode typography defaults, and wrote manual CSS where component props should have been. The problem was not the model's quality. The model had no way to know which components existed, which props were valid, or which tokens were mandatory, because that information had not been mapped via Code Connect.
Their resolution: complete Code Connect mappings, enforce token naming, add AGENTS.md with explicit instructions to call get_code_connect_map first. After that setup, the output changed substantially.
If your design system is immature, the Figma MCP workflow will faithfully reflect that immaturity in its output. The investment in Code Connect and token naming is a prerequisite, not an optional enhancement.
The token overflow problem requires prompt discipline
The 25,000-token MCP response limit is a hard constraint. Calling get_design_context on a Figma page with 50+ components can return 350,000 tokens, which gets silently truncated. The output looks complete but is missing context from the truncated portion.
The fix is always get_metadata first: identify the specific node ID for the frame you want to implement, then call get_design_context on that node only. This is disciplined prompting, not magic, and it requires users to understand why the metadata call matters.
Pros and Cons
Pros
- Code Connect integration means the agent uses your actual component library rather than rebuilding components from scratch, which dramatically reduces post-generation cleanup.
- Bidirectional workflow (code to Figma and Figma to code) compresses the iteration loop between designers and developers, removing the need for redline-based handoffs.
- The remote server requires no Figma desktop app and works from any environment, including cloud IDEs and CI pipelines.
- Design token generation via write-to-canvas can create complete color, spacing, and typography systems in minutes, replacing hours of manual variable configuration.
- Protocol portability: the same Figma MCP connection works with Claude Code, Cursor, VS Code Copilot, and OpenAI Codex through the same MCP standard.
Cons
- Starter plan users get 6 tool calls per month, which is not a functional quota for real work. The workflow requires at minimum a Professional plan Dev seat.
- Write-to-canvas is currently free in beta but will transition to usage-based pricing. Teams building workflows that depend on it cannot yet forecast the cost.
- The write-to-canvas permission model creates a friction point: Dev seats can only write to personal drafts, not shared production files. Teams where developers hold Dev seats need to account for this.
- A protocol version mismatch between the April 2026 Claude Desktop update and the current Figma extension causes connection failures that require manual troubleshooting.
- Design system quality is a hard ceiling on output quality. Teams with incomplete Code Connect mappings or inconsistent token naming will get correspondingly inconsistent code.
Who Should Use the Figma MCP Workflow
Use it if:
- Your team has an existing design system with Code Connect mappings and consistent token naming, because output quality scales directly with that investment.
- You are on a Professional, Organization, or Enterprise Figma plan with Dev or Full seats, since Starter plan rate limits make meaningful work impossible.
- Your team uses React or another component-based framework where design system component references in code actually reduce rework.
- Developers and designers are willing to share a bidirectional workflow rather than a one-way handoff process.
Skip it for now if:
- Your design system is a work in progress with incomplete Code Connect mappings, because you will spend more time fixing generated code than you save on handoff.
- Your team is on a Starter plan or without Dev/Full seats, since the rate limit will block real use within days.
- You are building a fast prototype where design system compliance does not matter, because Lovable or Bolt will ship a working prototype faster with less setup.
- Your organization has strict data residency requirements that prevent design file contents from being transmitted to AI providers, because this workflow sends design context to the Anthropic API.
What to Do Next
The Figma MCP server's write-to-canvas feature is still in beta, and the pricing model for it has not been announced. If your team is evaluating workflows that depend on code-to-Figma writes, build with the assumption that this feature will have a cost. Read Figma's rate limits and access documentation before designing workflows at scale.
For teams that have Code Connect in place, the setup-to-first-result path is short. The 10-minute installation process described above will have you running your first design-to-code prompt in under half an hour. The quality ceiling after that is your design system's maturity, not the integration.
If you want to go deeper on the agentic development side, our Cursor Background Agents guide and developer tools hub cover the broader workflows the Figma MCP integration plugs into.
Frequently asked questions
Yes. The Figma MCP server is protocol-based and works with any MCP-compatible client: Claude Code, Cursor, VS Code with GitHub Copilot, and OpenAI Codex. The setup differs slightly per client, but the same Figma API token and server URL work across all of them. Figma's MCP catalog lists supported clients and recommended setup steps for each.
A functional agentic workflow requires a Dev or Full seat on a Professional, Organization, or Enterprise plan. Starter plan users get 6 read tool calls per month, which runs out in a single complex session. Professional plan users get 200 calls/day; Enterprise plans get 600 calls/day. Write-to-canvas tools require a Full seat for writes to shared production files. Dev seats can only write to personal drafts.
You can run the MCP server without Code Connect, but the output quality will be significantly lower. Without Code Connect mappings, the agent cannot reference your existing components by import path, so it builds components from scratch with hardcoded values. The monday.com engineering team documented exactly this failure mode: output that looks visually correct but does not use the design system at all. Code Connect setup is a prerequisite for production-quality output, not an optional enhancement.
As of June 2026, yes. Write-to-canvas is available for free during the beta period. Figma has announced it will eventually move to a usage-based paid model, but has not published pricing details or a timeline. Teams building workflows that depend on write-to-canvas should monitor Figma's pricing announcements before committing to production pipelines at scale.
Calling get_design_context on an entire Figma page rather than a specific node returns far more
data than Claude Code's default 25,000-token MCP response limit. The response gets truncated and
the output is incomplete. The fix: always call get_metadata first to identify the specific node
ID for the frame you want to implement, then call get_design_context on that node only. Adding
an AGENTS.md file with instructions to follow this sequence prevents the error in future
sessions.